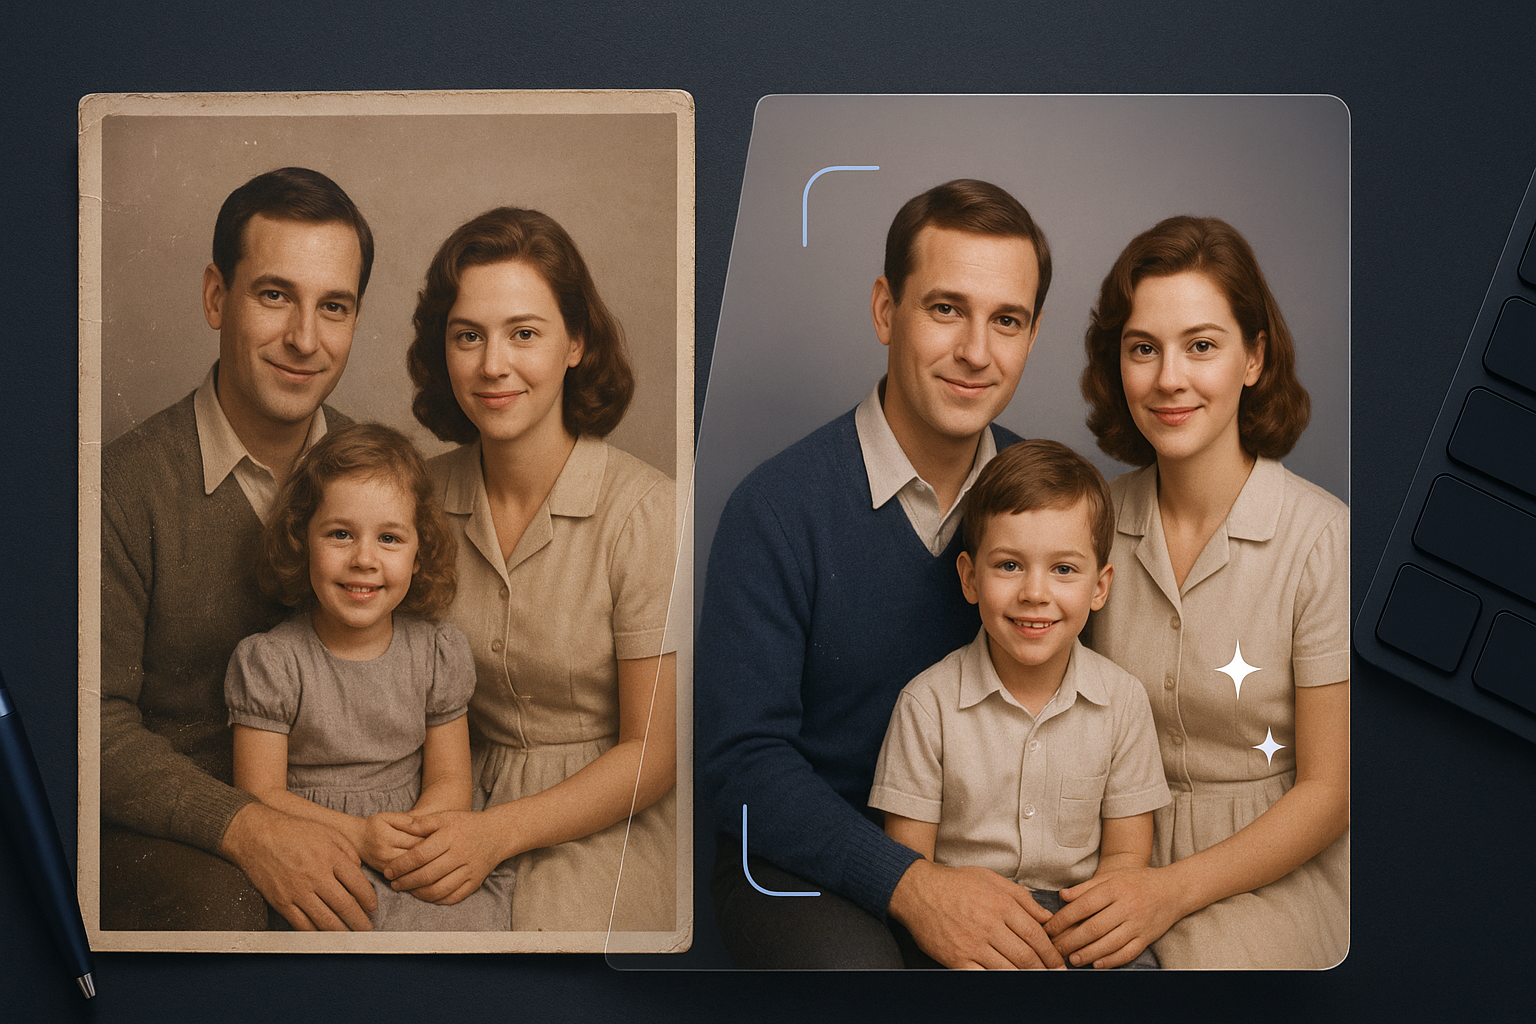
Restore Old Photo Online: What a Photo Enhancer Can Fix First
Restore old photos online with a simple fix-first workflow. Learn what a photo enhancer can solve first—then restore your image naturally.
Key Takeaways
If you want to restore old photo results that still look like your family (not a glossy AI rewrite), start with a quick triage: what’s actually “wrong” in the image.
A photo enhancer can often fix noise, softness, low resolution, and mild fading first—fast wins that make later restoration easier.
True old photo restoration is about repairing damage (scratches, spots, paper texture issues) and keeping faces authentic. AI helps, but it can’t bring back detail that was never captured.
If you’re comparing methods, the best decision isn’t “which tool is best?” It’s “which step comes first for my photo?”
A fast triage: what a photo enhancer can fix first
Most people waste time because they pick a tool before they diagnose the photo.
Use this table as a “what to do first” shortcut.
What you see in the old photo | What a photo enhancer can often fix first | When you’ll likely need restoration (or manual retouching) |
|---|---|---|
Looks grainy or “dirty,” especially in shadows | Denoise / artifact cleanup | If the grain is actually paper texture damage, mold spots, or heavy dust |
Looks soft (faces not crisp, edges melt together) | Sharpen / deblur | If faces are tiny in a group shot or the blur is extreme—AI may guess wrong |
Looks pixelated or too small after scanning | Upscale / increase resolution | If the scan is extremely low-res and details are gone—upscaling can’t “recover” what isn’t there |
Has a yellow cast or muted colors | Gentle enhancement / tone correction | If the photo has uneven fading, stains, or color shifts across regions |
Has scratches, cracks, missing bits | Sometimes light scratch reduction helps | For deep scratches/tears, you’ll need a restoration-focused workflow (and sometimes manual healing) |
Pro Tip: If you’re unsure whether you need enhancement or restoration, do a quick “clean + clarify” pass first (noise/blur/resolution). You’ll see the real damage more clearly—and you’ll avoid over-processing the final result.
How to restore old photo online without overprocessing
If you’re in the “restore old photos online” mindset, this is the sequence that usually produces the most natural results.
1) Preserve the original
Before you run anything:
Save a copy of the original scan/photo.
If you’re photographing a printed photo with your phone, avoid glare and harsh reflections.
This sounds basic, but it’s the easiest way to avoid the heartbreak of “I can’t get back to the original.”
2) Clean up noise and compression artifacts
Old scans often have:
scanner noise
compression artifacts from older JPEGs
grain that hides edges
Reducing noise first makes every later step smarter—especially sharpening and upscaling.
If you want a quick, focused tool for this step, an AI denoiser is built specifically for it (example: AI Denoise Image).
3) Fix blur next (only after noise cleanup)
Sharpening a noisy photo can amplify the ugliness. Once the image is cleaner, deblurring tends to look more natural.
If blur is your main blocker, a sharpening workflow (example: Sharpen Image) is usually the fastest “does this have a chance?” test.
4) Upscale once the photo is clean and readable
Upscaling is not magic—it’s a presentation upgrade. Done at the right time, it can:
make a small scan printable
make faces and details more legible
reduce the “this looks like a thumbnail” feeling
Done too early, it can lock in artifacts.
5) Do restoration and color last
This is where you decide what you really mean by “restore.”
Do you want a faithful version that still looks vintage?
Or do you want something that looks modernized?
Adobe’s workflow in “Old photo restoration in Photoshop” is a good reminder of the principle here: keep edits non-destructive, repair damage, and then refine.
And if you’re using an AI restoration approach, LetsEnhance’s guide on restoring old camera photos also reflects a similar logic: restoration first, then optional upscaling.
Enhancement vs restoration vs Photoshop: how to choose (without overthinking)
If you’re comparing methods and tools, compare them on criteria that actually matter for family photos.
Criterion 1: Authenticity (does it still look like your family?)
Best fit: gentle enhancement + targeted restoration
Watch out for: aggressive “beautify” effects that smooth skin into plastic or subtly change facial structure
If preserving identity is your #1 requirement, do fewer, smaller changes—and zoom in on faces before you download.
Criterion 2: Damage type (what’s actually wrong)
Mostly blur/noise/low-res: start with a photo enhancer for old photos.
Scratches/cracks/stains: you’ll likely need old photo restoration features, not just enhancement.
Criterion 3: Effort and skill
Online AI tools: fastest path, lowest learning curve
Photoshop: highest control, but more time and skill
If you’re restoring one or two precious photos, Photoshop can be worth the effort. If you’re restoring a stack of family scans, speed matters.
Criterion 4: Consistency and repeatability
Some AI tools produce slightly different results across runs and may require a few attempts to get the version you like. LetsEnhance notes this kind of variability in its tool comparison: “Best 4 AI old photo restoration tools”.
That doesn’t mean the tool is “bad.” It just means you should:
run 2–3 versions
compare at 100% zoom
keep the one that looks most true-to-life
Try it on one photo right now: Artedge AI Restore Old Photo
A simple online workflow to restore an old photo (in minutes)
If your goal is to restore one family photo quickly—without learning a pro editor—here’s a clean, low-friction workflow.
Step 1: Upload the best version you have
If you have multiple copies, upload the cleanest scan.
If the photo is a phone photo of a print:
shoot in soft light
keep the camera parallel to the print
avoid glare
Step 2: Start with “clarity” before you chase perfection
A fast enhancement pass can reveal whether the image is salvageable—and what damage is real.
If you want to test this step first, you can use a general enhancer (example: Enhance Image Quality Online).
Step 3: Restore and download, then verify at 100% zoom
When you’re ready to actually restore, run the restoration step, then check:
faces (especially eyes and mouth)
hairlines and edges (look for halos)
textured areas (look for waxy smoothing)
If anything looks “too new,” dial it back: less sharpening, less smoothing, fewer aggressive steps.
⚠️ Warning: If your photo is extremely low-resolution or heavily damaged, AI may fill missing areas by guessing. Always compare to the original so you don’t accidentally rewrite details that matter.
Why restorations look fake (and how to keep them natural)
If you’ve ever tried to fix blurry old photos and ended up with something uncanny, it’s usually one of these:
You sharpened before denoising
Noise gets sharpened too—so the entire photo turns crunchy.
You upscaled too early
Early upscaling can “bake in” defects.
You tried to fix everything in one pass
Old photos are layered problems: noise + blur + low resolution + aging. When you stack heavy edits all at once, the output stops looking like a real photo.
FAQ
Can AI restore missing detail in an old photo?
It can sometimes reconstruct what missing detail might look like, but it can’t truly recover information that was never captured (or was destroyed). Treat AI restoration as improvement—not time travel.
What if my old photo is scratched?
Light scratches can improve with restoration, but deep scratches and tears may still need manual healing for the most natural result.
What’s the difference between a photo enhancer and old photo restoration?
A photo enhancer is best for clarity problems (noise, softness, low resolution). Old photo restoration is best when the photo has age-related damage (scratches, fading, stains) and you want to preserve authenticity.
Should I use Photoshop instead of an online tool?
If you want maximum control and you’re restoring a small number of highly important photos, Photoshop can be worth the effort.
Next steps
If you’re comparing tools, the simplest “proof” is restoring one photo end-to-end and checking the face at 100% zoom.
Start with your one-photo test, then decide whether you need deeper repair.
Tags

Dr. Leo K. Anderson
Dr. Leo K. Anderson writes about AI photo enhancement, image upscaling, video quality improvement, and photo restoration. He focuses on practical, test-driven guides that help creators, e-commerce teams, and everyday users get clearer, more usable visual results with less effort.
Ready to Enhance Your Photos & Videos?
Improve clarity, restore old images, and upscale to 4K with natural, artifact-free detail — in seconds.
Start Creating