How to Improve Image Quality After Compression on Social
Pre-upload tips and a step-by-step post-upload repair workflow to restore clarity after compression on Instagram, Threads, and TikTok.
If your Instagram, Threads, or TikTok posts look soft, blocky, or off-color after you hit publish, you’re running into platform compression. This guide shows you exactly how to improve image quality after compression with a simple, closed-loop workflow: prevent damage before upload, then repair and re-upload when needed. Guidance is current as of 2026.
Key takeaways
Social apps resize and re-encode media to save bandwidth, which often softens details and adds artifacts.
You can reduce damage by exporting in sRGB at platform-friendly dimensions and sensible JPEG quality (typically around 80–85).
For Instagram: 1080 × 1080 or 1080 × 1350 for feed, 1080 × 1920 for Stories/Reels are widely used creator norms; similar tall formats work on Threads and TikTok.
When a post already looks blurry, repair the original (or best available copy), then re-export at the correct size and try again.
A short, repeatable workflow—diagnose → retrieve source → repair (unblur, denoise, artifact cleanup) → re-export—keeps turnarounds fast.
Why uploads look worse after posting
Social platforms aggressively optimize images and videos. Behind the scenes, they downscale oversized files, re-encode to smaller bitrates, apply lossy JPEG compression, and often use chroma subsampling (commonly 4:2:0). Those steps can reduce fine detail, introduce blocky edges, and cause banding on smooth gradients. For a clear explainer of how lossy compression discards data and creates visible artifacts, see the Cloudinary overview in the The Art of Compromise: How Lossy Compression Works (2025), which also links to a visual glossary of common artifacts. Read more in Cloudinary’s guides: the explanation of lossy trade-offs in the The Art of Compromise: How Lossy Compression Works (2025) and the Compression artifacts glossary (2025).
Before you upload — the preflight checklist
Think of this as sizing your image to the frame the platform prefers. When you upload close to those dimensions, the service has less reason to crush your file.
Universal export hygiene for cleaner posts
Color space: Export in sRGB end to end for web and mobile delivery. Adobe’s web delivery guidance consistently recommends sRGB for predictable color on consumer devices.
File format: Use JPEG for photos; use PNG for UI, text, and flat-color graphics to avoid mosquito noise.
JPEG quality: High-but-not-maximum typically yields the best balance. Many creator workflows use roughly 80–85 quality; going to 100 usually balloons file size with minimal visible gain and can trigger stronger server-side compression later. See practical optimization advice in the Cloudinary guide on reducing image size without excess quality loss (2026).
Output sharpening: Apply gentle output sharpening after you resize; avoid heavy halos that get smeared by re-encoding.
One-and-done exports: Avoid multiple resaves; export once from the master.
Platform-ready sizes and notes (creator-tested norms)
The following dimensions reflect common 2026 recommendations from reputable roundups and creator tools. They’re not official standards, but they’re widely used and perform well.
Platform | Common use | Recommended dimensions | Notes |
|---|---|---|---|
Feed (square) | 1080 × 1080 (1:1) | Widely accepted safe size; keeps grid sharp. Sources: Buffer 2026 IG size guide; PetaPixel 2026 social sizes. | |
Feed (portrait) | 1080 × 1350 (4:5) | Maximizes vertical real estate in feed; center key content. Sources: Buffer; PetaPixel. | |
Stories/Reels | 1080 × 1920 (9:16) | Full-screen vertical. Sources: Hootsuite social sizes 2026; Buffer. | |
Threads | Vertical image | 1080 × 1920 (9:16) or 1440 × 1920 (3:4) | Flexible ratios; keep width ≥1080 for sharpness. Sources: Hootsuite social sizes; Outfy Threads size guide 2026. |
TikTok | Photo Mode / covers | 1080 × 1920 (9:16) | Creator-tested standard for vertical. Sources: HeyOrca TikTok media specs 2026; Kapwing TikTok size guide 2026. |
Two quick rules help you consistently make pictures look clear after upload: resize to the target display size before posting, and keep JPEG quality high but not maxed. Following those alone often noticeably improves how to improve image quality after compression on social.
After you upload — the repair workflow
Sometimes you do everything right and the post still looks soft or artifacted. Here’s a fast, repeatable loop to recover clarity and try again.
Diagnose the issue
Is it global softness (fine textures look smeared)? Blocky edges or mosquito noise around text? Banding in skies or gradients? A quick diagnosis points you to the right fix.
Retrieve the best source available
Ideally, use the original export before it hit the platform. If you can only download from the app, expect a quality floor (double-compressed), and set expectations accordingly.
Run a targeted repair pass
Deblur to restore edges and detail, denoise to reduce compression grain, and apply artifact cleanup to mitigate blocks and ringing. Optional: light upscaling when the resolution is too low after cleanup.
Re-export and re-upload
Export in sRGB at the platform’s preferred dimensions (see the table above), with JPEG around 80–85 for photos (or PNG for graphics). Then test the re-upload.
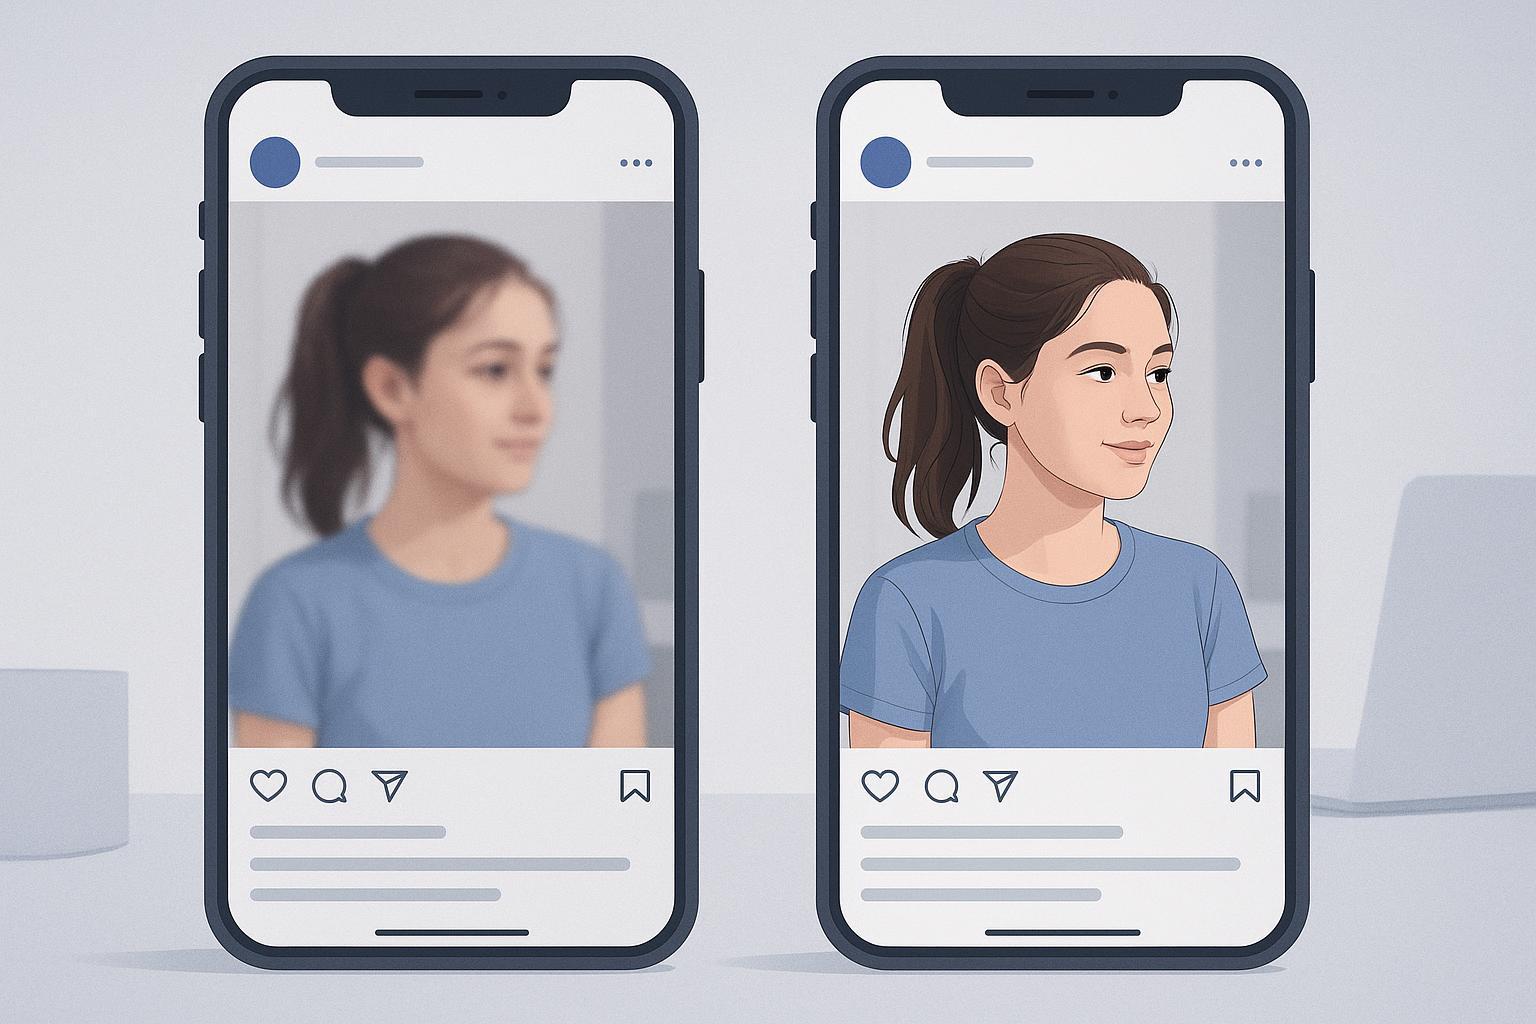
Practical example — repair with an AI tool
If you need a neutral, browser-based option, the Unblur Image workflow in Artedge AI can be used to repair softened or artifacted photos. Typical flow:
Upload your image (JPG/PNG/WebP supported).
Apply an unblur/enhancement pass and preview the change.
If faces need extra clarity, consider a face-focused pass.
Download the result, then export at 1080-wide (feed) or 1080 × 1920 (vertical) in sRGB before re-uploading.
Troubleshooting guide
Symptom | Likely cause | Quick fix |
|---|---|---|
Overall softness/“blurry” look | Oversized upload downscaled by platform; aggressive JPEG recompression; chroma subsampling smoothing edges | Resize to platform target (e.g., 1080 × 1350 for IG portrait), export JPEG ~80–85 in sRGB; if already posted, run an unblur + denoise repair, then re-upload |
Blocky edges, mosquito noise around text/icons | High JPEG compression or multiple resaves; using JPEG for flat graphics | Use PNG for UI/text; for posted content, run artifact cleanup + mild denoise, then re-export |
Banding in skies/gradients | 8‑bit JPEG quantization amplified by re-encoding | Add subtle dither/grain before export; keep quality high; if posted, run cautious denoise and re-export |
Colors look dull or shifted | Non‑sRGB export; inconsistent color management | Standardize on sRGB, embed profile, verify on mobile before posting |
For deeper background on why artifacts appear and how subtle preprocessing helps, see Cloudinary’s practical guide How to reduce image file size without losing too much quality (2026) and imgix’s overview of image optimization considerations in Improving site performance best practices (2026).
Quick fix checklist you can save
Grab the original export (or the highest-quality copy you have).
Run a repair pass: unblur → denoise → optional artifact cleanup.
Re-export at target size in sRGB (e.g., IG portrait 1080 × 1350; vertical 1080 × 1920) with JPEG ~80–85, or PNG for graphics.
Re-upload and check on a phone screen under normal brightness.
FAQs
Q: Why do my Instagram photos get blurry after posting even when they look sharp on my computer?
A: Instagram likely downscaled and recompressed your upload to meet its delivery targets. Uploading at platform-friendly dimensions (for IG, 1080-wide in the feed; 1080 × 1920 for Stories/Reels) and using sRGB with sensible JPEG quality reduces how much the platform needs to change.
Q: Is 100% JPEG quality better for social?
A: Usually not. It inflates file size with minimal visual gain and can provoke heavier server-side compression. A high-but-not-max setting (often around 80–85) typically balances quality and size. For a primer on balancing size and quality, see Cloudinary’s 2026 guidance linked above.
Q: What’s the best format for images with text or UI elements?
A: PNG. Text and flat graphics tend to suffer visible artifacts when saved as JPEG; PNG preserves edges more cleanly on social platforms that support it.
Q: Do Threads and TikTok have official photo size specs?
A: Public, official photo-size specs are limited. The commonly used creator-tested dimensions listed here (for example, 1080 × 1920 vertical) come from reputable 2026 roundups by Hootsuite, Kapwing, and HeyOrca. Specs can change—run a quick test before large campaigns.
You now have a practical, closed loop for how to improve image quality after compression: export at platform-ready sizes in sRGB, then repair and re-upload if a post looks soft. When a quick browser-based repair helps your workflow, you can try the neutral example process above and iterate until the preview on your phone looks crisp. For broader 2026 size references, see the consolidated overviews from PetaPixel’s social sizes guide (2026) and Hootsuite’s social media image sizes guide (2026).

Dr. Leo K. Anderson
Dr. Leo K. Anderson writes about AI photo enhancement, image upscaling, video quality improvement, and photo restoration. He focuses on practical, test-driven guides that help creators, e-commerce teams, and everyday users get clearer, more usable visual results with less effort.
Ready to Enhance Your Photos & Videos?
Improve clarity, restore old images, and upscale to 4K with natural, artifact-free detail — in seconds.
Start Creating